Sunday, November 1, 2009

Half double crochet, Double crochet, etc.

This is the fourth post in this series.  Please start here:
What do you need


Half Double Crochet (hdc)
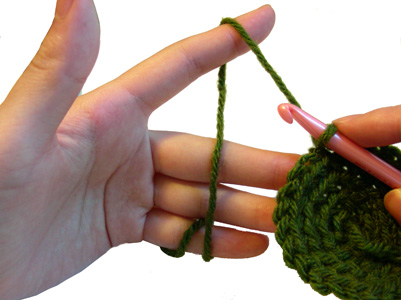
This will be your first variation on a single crochet.  And it only has one difference.  The difference is that you're going to Yarn Over (yo) before you start.  No, really, that's all.

  1. So be all prepared to make a single crochet.  Before you do anything else, wrap the yarn over your hook AS IF you were going to pull it through... but don't pull.  There are now 2 loops on your hook (yeah, it's kind of a stretch to call that one a loop, since it's just sitting there - but that's what it's called).
  2.  Now, ignore that extra loop.  Use your tension finger to hold the loose yarn toward the rear of the piece, which will keep that loop on the shank of your crochet hook (or hold it with a finger on your hooking-hand if you must).  Now stick the hook into the work the same way you would for a single crochet.  Grab new loose yarn and pull it out of the stitch, just like in a single crochet.  But now, instead of 2 loops on the hook, you've got 3: the new one, the yarn over, and the original one.
  3.  Now hook some loose yarn and pull through all 3 loops.

 Done!

Here's a video of it:
Half double crochet

Remember that a half double crochet requries TWO chains on the turn.


Double Crochet (dc)
There's only one difference between this and the half, and that's how many loops you pull through.  In fact, the way this works is the same as all remaining stitches - it never pulls through more than 2 loops at a time.  Once you master this, you're basically done.  Ready?
  1. Yarn over, just like in the hdc.
  2. Stick the hook into the next stitch
  3. Hook some loose yarn and pull it out of the stitch - you now have 3 loops
  4. Hook some loose yarn and pull it through TWO of those loops - the loop you pulled plus the original make 2 loops still on your hook
  5. Hook some loose yarn and pull it through those two loops.  You're done.
Here's a video - she starts this one into a chain:
Double crochet


The double crochet needs THREE chains on the turn.


Triple Crochet (tc)
This is the same as the double, except that you wrap two loops around your hook before starting.  Then you still never pull through more than 2 loops, so you'll need to do that an extra time in order to finish.


Triple crochet needs 4 turning chains.


Now what?  Patterns and pattern reading
That's it, you've learned all of the stitches.  No, really.  The pretty things you see are just based on how those stitches are combined and what stitches you go into.  For that you'll need one more stitch
Skip (sk)
Okay, it's not a stitch.  But you'll need to know it.


If you've been working on the same sampler all this time, and you haven't made any major mistakes, you should still have 11 stitches - the turning chain plus 10.    If you need to, start a new piece.  Chain 11 and then single crochet back down (starting in the 2nd chain from the hook) it so you've got a good base to work with.
  1. Chain 3.  This will pretend to be a double crochet. 
  2. Now chain 1 more - this is just a chain.  ;-)
  3. Skip the next stitch that you would normally go into.  Instead, double crochet in the next one.
  4. Repeat steps 2 and 3 until you get to the end.  You should now have 6 posts with 5 empty spaces.  One of those posts was your chain, but it should look just like the double crochets now. 
Here are the same instructions again - the numbering is going to change a little, but the stitches are identical:
  1. ch 3 (counts as dc)
  2. *ch, sk 1, dc* repeat from * to * to end.  (6 dc)
Okay, let's stitch our way back across.
  1. ch 3 (counts as dc)
  2. *ch 1, dc in dc* repeat to end, finishing in 3rd ch of turning ch 4.
This looks a little different on paper, but looks the same in your work.  You do the chain 3 as your turning stitch to replicate a double crochet.  Then you chain 1.  Double crochet in the top of your prior row double crochet (which means skipping over the chain, but the instructions don't say so).  Keep doing that until the end, but now you skip the 1 chain you've always skipped, and use to top of the original chain3 as if it were the double crochet it's pretending to be.

You still have the same number of stitches.  To prove it, chain 3 and double crochet across.  Go into the same part of the stitch, whether it's a chain or a double crochet, until you get to the end.  At the end, you'll need to work into TWO chain stitches - the chain 1 and the pretend double crochet.

Then chain 3 and work another row of double crochet back again.  When you're done, you should still have 11 posts.

Let's do something fancier.
  1. ch 4 (counts as dc and ch)
  2. sk dc, dc in next dc
  3. sk 2 dc, 5dc in next dc
  4. sk 2 dc, dc in dc
  5. ch, sk dc, dc in top of chain 3
Let's break that down
  1. Chain 4 (that's our turning chain for a double crochet, plus another chain)
  2. skip the next stitch (which is a dc) and double crochet in the one after (it's also a dc)
  3. skip 2 stitches (dc's) and do FIVE double crochets all in the same stitch - this is the center of the piece, if that helps you find it.
  4. skip two more stiches, then double crochet
  5. chain 1, skip a stitch, then double crochet in the top of the next stitch, which is the chain 3 turning stitch that was pretending to be a double crochet
Look at that!  Kind of pretty, isn't it?  Now let's go back and count how many stitches we did:
  1. ch 4 (counts as dc and ch)       - This is 2: a dc and a ch
  2. sk dc, dc in next dc                 - This is 1: just the dc (skipping things isn't stitching it's just direction)
  3. sk 2 dc, 5dc in next dc            - This is 5: the dc's
  4. sk 2 dc, dc in dc                     - This is 1: just the dc
  5. ch, sk dc, dc in top of chain 3 - This is 2: the ch and the dc
Now you can see clearly how we worked in toward the center, and mirrored our work back out again.  And we still have the same 11 stitches we've been working with the whole time.


How big is this thing gonna get?!?
The way you determine how many stitches make an inch is to crochet a sample piece with the yarn, hook, and primary stitch you're planning to use. If you make a piece that's about 20 stitches across and about 10 rows of double crochet or 20 rows of single crochet you should have a pretty good sample of how big your stitches are going to be. Then just use a ruler and figure out exactly how many stitches and rows you made per inch.

This is called "checking your gauge" and most patterns will tell you exactly how many stitches of what type to use for your sample, and what the measurements should be. If the final size of the piece matters (like for the slippers I'm making) you should *always* do this before starting the "real" piece. So for my slippers, I obviously have to end up with the right size *and* I can't change the number of stitches or I won't be following the pattern and it will all go wrong. So if my gauge is wrong, I change to a larger or smaller hook and make another sample to see if I've got it right. For something where size doesn't need to be as precise (like an afghan) you can just pick something comfortable and go with it.

Slip stitch, Single crochet, Turning

This is the third post in this series.  Please start here:
What do you need

Where do I stitch?
Well, this depends partly on what you're doing and who you ask.  For particularly sturdy work, you want to go into the entire top of the stitch.  For lighter work you only need to go into the back loop of the stitch.  Obviously if the directions tell you which to do, you should do that.

As you crochet more and see how doing it differently changes the look, you might decide that one or the other is best for what you're doing. 

This is going under the entire stitch (ignore the arrow, it's not my picture):


When the directions say to do something "in the loop", that implies that you've made a loop somewhere in your prior work.  In a prior row or round you may have done a chain, which leaves an open space in your work.  To work in that loop means that instead of going into one of the stitches, you're going to actually stick your hook in that big open space and the stitch you make now is going to wrap around the chain itself, instead of just the top of a stitch.

Slip Stitch (sl st)

This is used in two places:
  1. You need to connect two parts together without creating additional stitches - this is also called "joining"
  2. You need to start your next stitch in a different place than you're currently working
You'll use this stitch a lot when working in rounds.  Every time you end a round, you'll need to connect the last stitch of the round to the first stitch of the round, before starting a new round.  It's very easy to do.  You just put the hook where ever the directions say, then hook the loose yarn and pull it through everything on the hook all at once.  If the directions say "slip stitch to join to 3rd chain" then you stick your hook in the third chain.  If the directions say "slip stitch to next chain 3" then you'll need to find the next chain 3 (don't worry, you'll be able to spot it) and work a slip stitch into the top of each stitch between here and there.  This is like building an underground tunnel so you can pop up over there without ruining the look of everything in between.

Here's a slip stitch in action:
Slip stitch into a chain

When working a round piece, the directions will often say to chain x times and join to make a circle.  What they mean is to chain x and then slip stitch into your FIRST chain. 
Here is a picture of "Chain 6 and join to make a ring"


Note that this is going into the back AND the bottom of the stitch.  :-D  It makes it more stable.


Single Crochet (sc)

Now we're getting into the meat of it all.
For the single crochet, you're going to stick the hook through the stitch where ever the instructions say.  (If you're not working from instructions, when working a single crochet into a row of chain, you want to start in the SECOND chain stitch from the hook.  I'll explain why later.) 
  • So stick your hook through the stitch.
  • Remember the motion you used to grab the loose yarn when chaining?  Use that same motion here and grab the loose yarn.
  • The motion you used to pull through?  Use that now to pull the loose yarn back through the stitch but not through the yarn that was already on the hook.  You should now have TWO loops on your hook.
  • Now again grab the loose yarn, and pull through both loops.  This is the same motion as the chain, but pulling through 2 instead of 1.  If you can't get through both loops at the same time that's okay, pull through one, get a fresh grip, and pull through the second one without grabbing more loose yarn.
Here's a good video of doing a single crochet into a chain, then going back through and doing single crochet into the prior row of single crochet.
Single Crochet

Turning stitches
So why do you go into the second chain?  And why does she need to chain 1 before starting the row of single crochet?

The row of single crochet has height, and we're working from the top of it.  Think of a brick wall.  When you start a new row, and you put down the first brick in that row, you don't want your brick to slope up to the new height, you want to BE at that height and keep working across from that height, right?  By chaining once you move the hook away from your work by one stitch - which is the height of a single crochet.  So now you're at the correct height and you can work across.  That chain will take the place of the first single crochet in that row.  When you work back across you won't be able to tell that it was a chain instead of a single crochet - it will look exactly the same.  So you're faking a single crochet in a way that gets you up to the height you need.

All crochet stitches have their chain-height equivalent.  A double crochet takes 3 chains to fake.  Why not 2?  Because there's a stitch in between called a half double crochet and it takes 2.  So a triple crochet takes 4 chains.  There IS a stitch called a double triple crochet, and it takes 5 chains, but you'll seldom need it.

All well-written crochet patterns will tell you how many chains to use for your turning stitch, so you don't need to memorize this.  I'm explaining it because you might find it helpful to know WHY you're doing it.


A simple practice piece
You now know enough stitches to make an actual piece.
  1. Chain 11
  2. Working back along your chain, starting in the second chain from the hook, single crochet across.  This will require 10 single crochets, not including your turning chain.
  3. Chain 1.  Starting in the top of the prior single crochet, single crochet across.  This is 10 single crochets.
  4. Repeat as many times as you like!
I'm now going to rewrite the above directions using standard crochet abbreviations, the same way a regular crochet pattern would look.
  1. ch 11
  2. sc in 2nd ch.  sc in ch 9 times
  3. ch 1.  sc in sc 10 times
How do you know that the single crochets don't all go in the same chain?  Because the directions would tell you so very clearly.  They would say "sc 9 times in same ch" or if there were multiple stitches they would say "(sc, dc, sc) in chain" which means "(single crochet, then double crochet, then single crochet) all in the same chain."

But we haven't learned a double crochet!

Yet...

Lesson 4 

Slipknot, Chain stitch, and how to hold everything

This is the second post in this series.  Please start here:
What do you need

How much is there to learn?
Crochet is actually very simple.  There are only three things you'll do:
1) Wrap yarn around the hook
2) Stick the hook into something
3) Pull a loop of yarn through something

The number of times you wrap the yarn, where you stick the hook, and how many things you pull the yarn through, are what makes all the various stitches and patterns.

Really, that's the whole thing.

So let's do some actual stitches!


Holding the yarn - Tension
You're going to hold the yarn in your non-dominant hand (the left hand for most of us).  There are probably 20 ways to hold your yarn.  Maybe more.  The video on chaining at the bottom of this post demonstrates a very simple one.  I use a variation on that same method, where I wrap the yarn once around my pinkie.  Some people alternate over-under their fingers instead of straight down their palm.  No matter how you hold the yarn, the object is to be able to both let the yarn slide freely through your fingers and lock it down firmly to create tension.  You'll need to lock it down while you're doing a stitch, but that will use up the available yarn so you'll need to slide some more through to work with. 

So why can't you just hold the yarn in your fist?  Because that hand will also need to hold the piece you're working on.  You'll be using your dominant hand (right hand, usually) to hold the hook, so obviously you'll need the other hand to hold the piece you're trying to stick the hook into. 

We're going to use our thumb and middle finger to hold the piece we're working on (I'm just going to call it "the work" from now on).  We're going to use our pointer finger to hold the loose end of the yarn where we can grab it with our hook.  That leaves our pinkie, ring finger, and palm to deal with clamping down on the yarn. 

Here are pictures of the some yarn holding methods:
This is the simplest method:

This is the one I use - the pinkie wrap - it is much easier on me because of my fingernails
(This picture is only to show how the yarn is wrapped - when working I close my hand, similar to the grip shown above):

This is the over-under wrap:
Use whatever method works for you.  None of them are going to feel comfortable at first.  ;-)  But you'll get used to them.

Holding the crochet hook
There are two ways to hold the hook, overhand or underhand (like a hammer or like a pencil).  You should pinch the crochet hook on the pad, between your thumb and pointer finger, with the hook facing you.  If your hook doesn't have a pad, pinch about a third of the way down the shaft - but try to get one with a pad, it will make it easier on you.  I use the overhand (hammer) hold.  But if the underhand feels better to you, go for it.


The slipknot
This is how you'll start every crochet project.  The whole goal is to get one loop on your hook.
These videos demonstrate it very well:
Slip knot with hook
Slip knot with fingers
I use my fingers, but you can use whichever method works for you.  They both get you to the same place.  If you made one with your fingers, put the loop on your hook and pull the tail (the short end of the yarn) until the loop is closed around your hook.
DO NOT make your loop very tight on the hook.  Just close it enough that it doesn't fall off.  Then open it back up until you would have almost enough room to slide another crochet hook into the loop.  That should give you enough room to work.

The chain (ch)
("ch" is the abbreviation used in crochet patterns.  I'll put the abbreviation after each stitch I explain.)
The chain is a vital thing to learn.
  • Almost every project will begin with a chain.
    • When you make a rectangular project, you chain the full width of the project, and then work back and forth in various other crochet stitches until you have the length you want.
    • When you make a round project (and many squares are created in rounds) you make a chain that you then fasten to itself to form a circle, and then you keep working around the circle until you have the size you want.
  • The chain is also a stitch in its own right.
    • The beginning of each new row in a rectangular project, or each new round in a round project, will usually begin with a chain.  This is used to get you to the correct height to match the other stitches you'll be doing.
    • The middle of any project might use a chain stitch to get you from one place to another.  The chain is used to make open, airy patterns.
  • The chain is the basic stitch upon which all other stitches are based.
    • Once you learn how to chain, you should do A LOT of chaining.  If you get comfortable with the chain you will be able to do all other stitches very easily, since they use the same motions.
    • Make a chain of 30 stitches.  Then remove your hook and pull the long end of the yarn so all the stiches come out.  Start over and do it again.  Keep doing this until you are very comfortable with it and all the stitches look about the same size.  If your yarn gets too ragged, cut off the part you've been using and start over with fresh yarn.
    • I can't emphasize this enough.  Get good at chaining.  All the rest will follow.
This is an excellent video on making a chain - he starts with another method of making a slipknot.  Again, use whatever slipknot makes sense to you - they all get you to the same place.
Crochet chain stitch

How does he get the hook to slip through the loop so easily?
This is all about tension!  Watch the video again, but this time pay attention to how he's pinching the work in his thumb and "nasty finger" and pulling it down, away from the shaft of the crochet hook (which he is pulling up).  This makes the loop on the shaft into a teardrop shape.  Definitely note that teardrop shape - that's the key to everything!  This gives enough clearance for the hooky-part of the hook to go through without snagging on anything.  At the same time, he's using the pointer finger of his left hand to hold the tension on the yarn he's pulling through, which keeps it snugly in the hook.

Practice chaining until all of that comes fairly easily to you.  All the rest of the stitches work the same way, so once you're comfortable with the chain you can join me in lesson 3 and we'll fly through everything else!


Lesson 3 

What do you need

You'll need a hook, and some kind of material.

There are a LOT of hooks available.
Click here for pictures of various crochet hooks
The size of the hook will need to be appropriate to the size of the material you plan to crochet with.  If you're going to crochet strips of fabric, you'll want a big wood or plastic hook about a foot long:


If you're working with thread, you'll want an itty bitty steel hook like the ones on the bottom here:


For yarn, you'll usually use a medium sized steel hook, and they usually come in various (completely meaningless) colors:


The stitches are exactly the same no matter what material or what size hook.  But the videos and pictures I've chosen are all using standard yarn-size hooks.  A "G" hook is very common, though as a beginner you might be more comfortable starting with a larger hook, like a J or K.

The size of the hook will be on the pad - the flat part of the shank. 
These are the official names of the parts:


For yarn, I suggest a 4-ply worsted weight yarn.  This is the standard yarn you think of when you think of yarn.


I strongly recommend you get TWO skeins of yarn (a skein is a bundle). When you work with the same piece of yarn multiple times it starts to fall apart. So get one skein for you to do all of your practicing with, and a second one for your "real" work when you're ready. Don't get anything with special textures. You want everything to be easy to see and identify.  Once you've had more practice you can get other materials and textures.

Ready?  Let's go!