What do you need
How much is there to learn?
Crochet is actually very simple. There are only three things you'll do:
1) Wrap yarn around the hook
2) Stick the hook into something
3) Pull a loop of yarn through something
The number of times you wrap the yarn, where you stick the hook, and how many things you pull the yarn through, are what makes all the various stitches and patterns.
Really, that's the whole thing.
So let's do some actual stitches!
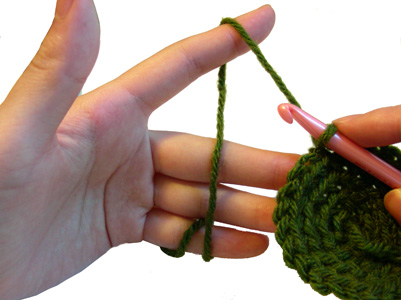
Holding the yarn - Tension
You're going to hold the yarn in your non-dominant hand (the left hand for most of us). There are probably 20 ways to hold your yarn. Maybe more. The video on chaining at the bottom of this post demonstrates a very simple one. I use a variation on that same method, where I wrap the yarn once around my pinkie. Some people alternate over-under their fingers instead of straight down their palm. No matter how you hold the yarn, the object is to be able to both let the yarn slide freely through your fingers and lock it down firmly to create tension. You'll need to lock it down while you're doing a stitch, but that will use up the available yarn so you'll need to slide some more through to work with.
So why can't you just hold the yarn in your fist? Because that hand will also need to hold the piece you're working on. You'll be using your dominant hand (right hand, usually) to hold the hook, so obviously you'll need the other hand to hold the piece you're trying to stick the hook into.
We're going to use our thumb and middle finger to hold the piece we're working on (I'm just going to call it "the work" from now on). We're going to use our pointer finger to hold the loose end of the yarn where we can grab it with our hook. That leaves our pinkie, ring finger, and palm to deal with clamping down on the yarn.
Here are pictures of the some yarn holding methods:
This is the simplest method:

(This picture is only to show how the yarn is wrapped - when working I close my hand, similar to the grip shown above):
This is the over-under wrap:

Use whatever method works for you. None of them are going to feel comfortable at first. ;-) But you'll get used to them.
Holding the crochet hook
There are two ways to hold the hook, overhand or underhand (like a hammer or like a pencil). You should pinch the crochet hook on the pad, between your thumb and pointer finger, with the hook facing you. If your hook doesn't have a pad, pinch about a third of the way down the shaft - but try to get one with a pad, it will make it easier on you. I use the overhand (hammer) hold. But if the underhand feels better to you, go for it.

The slipknot
This is how you'll start every crochet project. The whole goal is to get one loop on your hook.
These videos demonstrate it very well:
Slip knot with hook
Slip knot with fingers
I use my fingers, but you can use whichever method works for you. They both get you to the same place. If you made one with your fingers, put the loop on your hook and pull the tail (the short end of the yarn) until the loop is closed around your hook.
DO NOT make your loop very tight on the hook. Just close it enough that it doesn't fall off. Then open it back up until you would have almost enough room to slide another crochet hook into the loop. That should give you enough room to work.
The chain (ch)
("ch" is the abbreviation used in crochet patterns. I'll put the abbreviation after each stitch I explain.)
The chain is a vital thing to learn.
- Almost every project will begin with a chain.
- When you make a rectangular project, you chain the full width of the project, and then work back and forth in various other crochet stitches until you have the length you want.
- When you make a round project (and many squares are created in rounds) you make a chain that you then fasten to itself to form a circle, and then you keep working around the circle until you have the size you want.
- The chain is also a stitch in its own right.
- The beginning of each new row in a rectangular project, or each new round in a round project, will usually begin with a chain. This is used to get you to the correct height to match the other stitches you'll be doing.
- The middle of any project might use a chain stitch to get you from one place to another. The chain is used to make open, airy patterns.
- The chain is the basic stitch upon which all other stitches are based.
- Once you learn how to chain, you should do A LOT of chaining. If you get comfortable with the chain you will be able to do all other stitches very easily, since they use the same motions.
- Make a chain of 30 stitches. Then remove your hook and pull the long end of the yarn so all the stiches come out. Start over and do it again. Keep doing this until you are very comfortable with it and all the stitches look about the same size. If your yarn gets too ragged, cut off the part you've been using and start over with fresh yarn.
- I can't emphasize this enough. Get good at chaining. All the rest will follow.
Crochet chain stitch
How does he get the hook to slip through the loop so easily?
This is all about tension! Watch the video again, but this time pay attention to how he's pinching the work in his thumb and "nasty finger" and pulling it down, away from the shaft of the crochet hook (which he is pulling up). This makes the loop on the shaft into a teardrop shape. Definitely note that teardrop shape - that's the key to everything! This gives enough clearance for the hooky-part of the hook to go through without snagging on anything. At the same time, he's using the pointer finger of his left hand to hold the tension on the yarn he's pulling through, which keeps it snugly in the hook.
Practice chaining until all of that comes fairly easily to you. All the rest of the stitches work the same way, so once you're comfortable with the chain you can join me in lesson 3 and we'll fly through everything else!
Lesson 3
No comments:
Post a Comment